Showing posts with label QTP. Show all posts

Sunday, May 20, 2012

Passing Parameters between QTP tests stored in Quality Center

In our recent project we had a requirement of passing some captured values in one test to another test in sequence of execution during runtime. We needed a solution which took lesser time to be implemented and tested, while satisfying our need to integrate 02 test instances in the test lab of Quality Center without getting dependent on other external data sources/utilities such as flat files, excels and file system object.
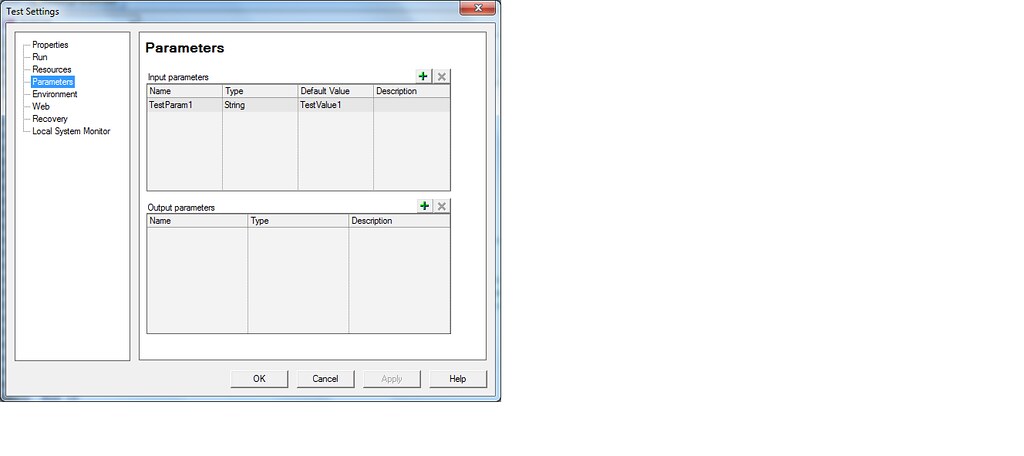
  1. Create a Test with Test Input Parameters using Test Settings
http://farm7.static.flickr.com/6143/5955598728_2fb7fe89a0_b.jpg
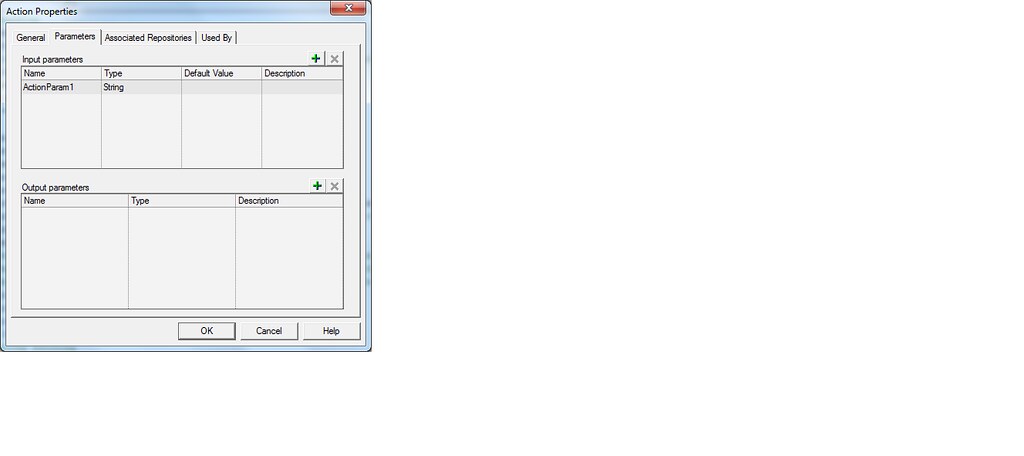
  1. Create Action Input Parameters in desired Action using Action Properties
http://farm7.static.flickr.com/6128/5955038667_c5703a5a90_b.jpg
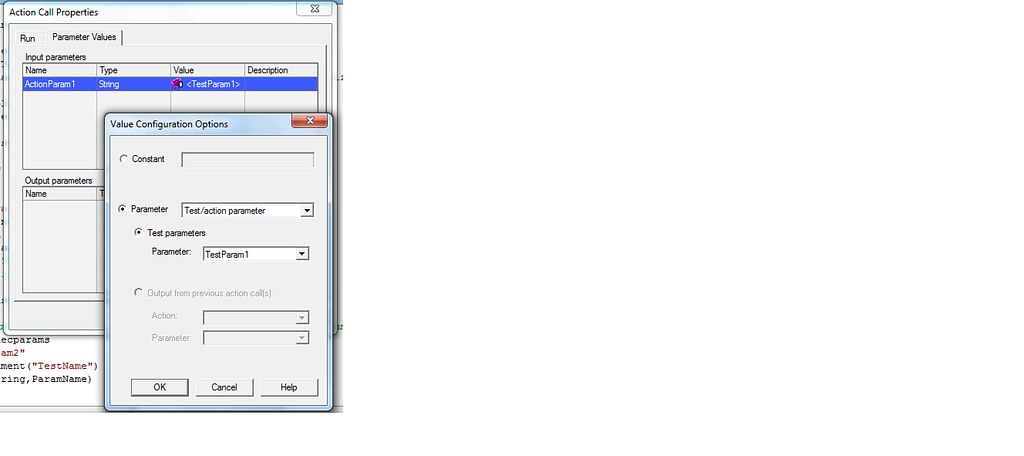
  1. Link Above created Action and Test Parameter Using Action Call Properties
http://farm7.static.flickr.com/6007/5955039561_71113d0531_b.jpg
It is mandatory for us to link Action and Test Parameters as shown above, so that we can access the test parameters in an Action like below
ValueofTestParam = Parameter("ActionParam1")
Then Save the test in Test Plan Module. Ensure that your QTP is connected to QC
  1. Create a Test Set and Drag test in Test Lab Module of Quality Center Using Select Tests Tab
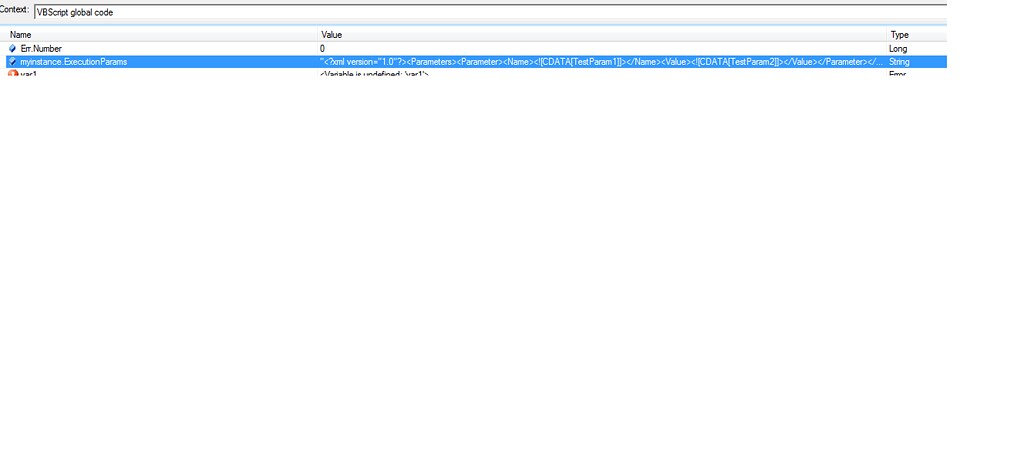
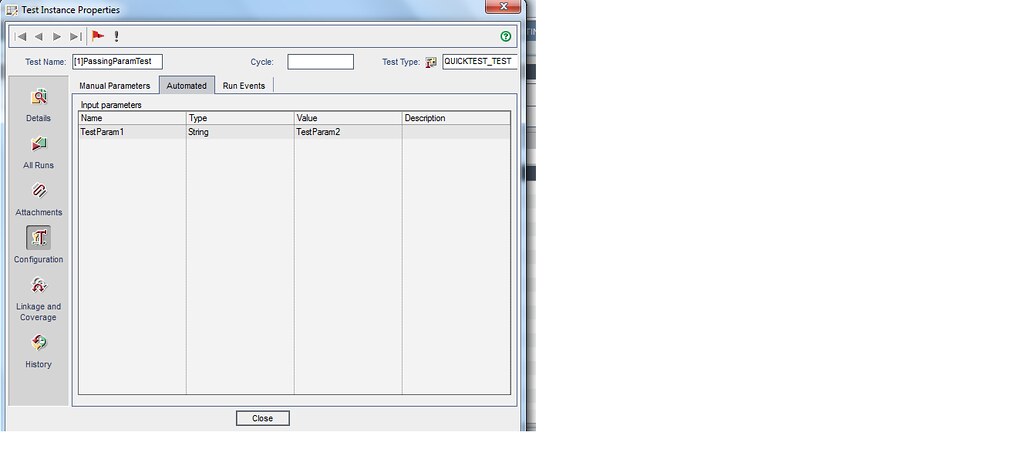
Now the Dragged instance of our test should be capable of recieving values from any other code/test. Have a look at the properties [3] of the dragged instance.
http://farm7.static.flickr.com/6150/5955039317_bf50e2474b_b.jpg
  1. Code in a common library
  1. Access Test Instance and its properties using OTA API
'Code to access the next test instance in Execution Flow
'Not a very clean code, please take care of declarations

Set TDC = QCUtil.QCConnection
set TSfact = TDC.TestSetFactory
Set TreeManager = TDC.TestSetTreeManager
Set tsFolder = TreeManager.NodebyPath("Root\Pathto\YourTestSetFolder")
Set TestSetList = tsFolder.FindTestSets("YourTestSetName")
Set theTestSet = TestSetList(1)
set TSTestFact = theTestSet.TSTestFactory
Set TestSetTestsList = TSTestFact.NewList("")

' You can take the other values as required in your framework
Inst = 1
TestName = "GettingParamTest"
InstanceName = "[" & Inst &"]" & TestName

For Each myinstance in TestSetTestsList

If Ucase(Trim(myinstance.Name)) = Ucase(Trim(InstanceName)) Then
        'I have got my instance
        Set MyTestInstance = myinstance
End If
  1. Study the xml format of automaion parameters stored in Quality Center
ExecutionParams property of a test instance has following xml representation
http://farm7.static.flickr.com/6147/5955039015_bd153103ac_b.jpg

<?xml version="1.0"?>
<Parameters>
        <Parameter>
                <Name><![CDATA[TestParam1]]></Name>
                <Value><![CDATA[ParamValue1]]></Value>
                <Name><![CDATA[TestParam2]]></Name>
                <Value><![CDATA[ParamValue2]]></Value>
        </Parameter>
</Parameters> 
  1. Plan modification of test instance parameters' values during runtime
ExecutionParams property of testinstance object returns a string(which is above mentioned xml )and the property is writable too.
NewParamsAndValues = Array("TestParam1>NewParamValue1","TestParam2>NewParamValue2")
OriginalParams = MyTestInstance.ExecutionParams

ModifiedParams = GetModifiedParams(OriginalParams,NewParamsAndValues)
' I am not writing the function GetModifiedParams in the example| You can write
' your own logic of manipulating the strings and values

MyTestInstance.ExecutionParams = ModifiedParams

print MyTestInstance.ExecutionParams
  1. How modified values will persist ?
Once you print MyTestInstance.ExecutionParams it will show the modified values for the test parameters, but these values do not persist. And these modified values need to persist for the next test instance to pick up in execution flow, Therefore We need to use post and refresh method ofMyTestInstance object.
MyTestInstance.Post()
MyTestInstance.Refresh()

Run Action Statement In QTP


Runs the specified action in the test.

Note: The RunAction statement can run only actions that are already associated with your test as part of the test flow. Therefore, in order to enter a RunAction statement in the Expert View for an external action, you must first insert a call to the action (Insert >Call to Action) or copy the external action (Insert > Copy of Action) into your test. Using this option associates the action with the test and also inserts a RunAction statement for you. After the the external action is added to the test flow, you can add additional calls to that external action in the Expert View.

If you insert a RunAction statement in the Expert View for an external action that is not already associated with your test as a part of the test flow, the RunAction statement fails. For more information on copying or calling external actions, see the HP QuickTest Professional User Guide.

Syntax

RunAction ActionName, [Iteration , Parameters]


Argument

Type

Description

ActionName

String

The name of the action.

Iteration

Variant

Optional.

-- oneIteration or 0 (Default)—Runs the action only once, using the row in the action's data sheet that corresponds to the global data sheet iteration counter.

If the action's data sheet contains fewer rows than the global sheet, the last row of the action's data sheet will be used for each subsequent iteration.

-- allIterations or 1—Runs iterations on all rows.

-- iteration row range (for example, "1-7")—Indicates the rows for which action iterations will be performed

Note: Iteration is required when calling an external action, but optional when calling a local action (from within the test).

Parameters

Variant

Optional.

The values and storage locations for the called action's input and output parameters. Input parameters are listed before output parameters.

For an input parameter, specify either a fixed value or the name of another defined parameter (Data Table parameter, environment parameter, or an action input parameter of the calling action) from which the argument should take its value.

For an output parameter, specify either a variable in which you want to store the value or the name of a defined parameter (Data Table parameter, environment parameter, or an action output parameter of the calling action).

Return Value

Variant.

If the action called by the RunAction statement includes an ExitAction statement, the RunAction statement can return the value of the ExitAction's RetVal argument. For more information, see ExitAction Statement.

Examples

The following example calls the SearchFlight action, and runs all iterations of the action.

RunAction "SearchFlight", allIterations

The following example performs the same call as the previous example, but runs only one iteration of the action and saves the returned value to the AxnVal variable.

AxnVal=RunAction ("SearchFlight", oneIteration)

The following example runs one iteration of the action, supplies a string value of MyValue for the input parameter, and stores the resulting value of the output parameter in a variable called MyVariable.

RunAction "Action2", oneIteration, "MyValue", MyVariable

Sunday, May 13, 2012

Difference Between Test And Action Parameters


Many QTP user confuse between Test and Action Parameters. This article will explains both the concepts in details and eliminate any confusion. QTP Help does not describe the method of using Test Parameters

Test Parameters

Test Parameters can be used to pass values to the test and retrieve values when the test completes. They are global parameters and can be accessed in any action or rather any scope. They are of two type – Input and output. Input Parameters are used to pass values to the test while Output Parameters are used to retrieve values from the Test.
Adding the Test Parameters
Test parameters can be added in the File->Settings…->Parameters (Tab) as shown in the image below
Adding Test Parameters
Note: Parameter names are case sensitive. Once added a parameter’s order can’t be changed, changes can only be done by deleting and re-creating the parameters.
Accessing Test Parameters
This is nowhere documented in the QTP Help file, but we can use Test Parameters using the TestArgs object. The code below shows how to access a parameter named ‘InputDataTable’
inputDataTable = TestArgs("InputDataTable")
Note: Many times Test Parameters are confused with Action Parameters and one tries to access the value using the Parameter object, which generates a ‘Parameter not found’ error.
Passing the Test Parameters
Test Parameters can be passed in three different ways
  1. Through the ‘Input Parameters’ tab of the Run window as shown in the image below
    Passing parameters through Input Parameters tab of Run window
    Passing parameters through Input Parameters tab of Run window

  2. Through QTP Automation Object Model (AOM) – We can also pass values of input parameters using the QTP AOM. The code needs to be run in a program external to QTP, ex – VBScript. The code shown below demonstrates the passing of test parameters
    'Launch QTP
    Set qtApp = CreateObject("QuickTest.Application")
    qtApp.Launch
    qtApp.Visible = True
     
    'Open a test
    qtApp.Open "C:\TestInputParams"
     
    ' Retrieve the parameters collection defined for the test.
    Set oParams = qtApp.Test.ParameterDefinitions.GetParameters()
     
    oParams.Item("InputDataFile").Value = "C:\NewTestData.xls"
     
    ' Run the test with changed parameters.
    qtApp.Test.Run , True, oParams
  3. Through Quality Center (QC) – We can also pass the parameters through. This option is only available when the test is added to a TestSet in TestLab

Action Parameters

Action Parameters can be used to pass or retrieve values to or from an Action.
Adding Action Parameters
Action parameters can be added in the Parameters tab of Action properties as shown in the image below
Adding Action Parameters
Accessing Action Parameters
Action Parameters can be accessed using the Parameter object. The code below demonstrates how to access a Input parameter named ‘InputValue’
sInputValue = Parameter("InputValue")
Note: Input parameters are NOT read-only and their value can be changed at run-time within the Action.
Action Parameters can only be accessed inside the Action they belong to.
Passing the Action Parameters
Action parameter can be passed in the RunAction call. All Input Parameters are passed first and then all the Output Parameters. Input Parameters can be passed as Constant Values or Variables. Example
RunAction "ActionParams", oneIteration, "C:\Test"
sInputValue = "C:\Test"
RunAction "ActionParams", oneIteration, sInputValue
Output Parameters need to retrieved through variables only. Output Parameters can be ignored by skipping the parameter in RunAction. Example – If a Action takes two parameters one Input and Output, we can call the Action in various ways as shown in code below
'Ignoring the Output Parameters
RunAction "ActionParams", oneIteration, "C:\Test"
sInputValue = "C:\Test"
RunAction "ActionParams", oneIteration, sInputValue
 
'Retrieving the Output Parameter
Dim sOutputValue
RunAction "ActionParams", oneIteration, sInputValue, sOutputValue
RunAction "ActionParams", oneIteration, "C:\Test", sOutputValue
Note: While calling an Action for all of it’s iterations, Output Parameters values can’t be captured. This happens because one call to the RunAction can run the Action for all of it’s iteration. Hence, on every iteration the Output Parameters value will be overwritten.

Sunday, April 22, 2012

QTP Timeout Setting

QTP has several timeout out settings, some of which can be defined both through the QTP IDE and/or using vbScript program statements. Some of these timeouts are defined in milliseconds, tenths of a second, seconds or a combination of these values. Furthermore when there is both a IDE setting and a program function, the names for the setting are often different. This posting (hopefully) correctly lists all.

1. Object Sync Timeout is the time that QTP waits for an object to come into existence:

IDE Setting: Test Settings, Run Tab, the “Object Synchronization timeout:” setting. In version 8.x this value is specified in milliseconds and in version 9.x it is specified in seconds (Mercury just wanted to keep us on our toes, huh?)

Program Setting: Setting(“DefaultTimeout”) [=milliseconds] ‘in both 8.x and 9.x

2. Browser Navigation Timeout is defined as “sets the maximum time (in seconds) that QuickTest waits for a Web page to load before running a step in the test”. So how does this differ from and/or interact with the Object Sync Timeout setting? Mercury isn’t saying, so I guess we all need to experiment when testing a pokey web app. Anyway this setting is specified as follows:

IDE Setting: Test Settings, Web tab, “Browser navigation timeout:” X “seconds”

Program Setting: none that I can find, but it seems likely there is one (anyone?)

3. Default Load Time is described in QTP help as “Instructs QuickTest to add a specified number of seconds to the page load time property specified in each Page checkpoint” (for the IDE setting) and as “Indicates the time to add, in seconds, to the load time during recording” (for its programmatic counterpart). Confused? I sure am. Added to what? Perhaps Browser Navigation Timeout? Here again, Mercury is not saying. As per the IDE setting, appears to only be relevant for web applications—-but then how do I achieve the same thing for say a new screen load in my .NET app? (I believe the answer to this rhetorical question is: uses Object Sync Timeout). Anyway this setting is specified as follows:

IDE Setting: Options, Web Tab, “Add” x “seconds to page load time”

Program Setting: Setting(“DefaultLoadTime”) [=seconds]

4. Activate Window is described as “specifies the time (in tenths of a second) that QuickTest waits before it sets the focus on an application window when using the pointing hand to point to an object in the application (for Object Spy, checkpoints, Step Generator, Recovery Scenario Wizard, and so forth)”. I have never changed the default for this setting, which defined as 5 tenths of a second. I guess Mercury thought the mixing of seconds and milleseconds all over the place was not confusing enough, so here we have a tenths of a second setting.

IDE Setting: Options, General tab, “When pointing at a window, activate it after” X “tenths of a second”

Program Setting: none that I am aware of

5. The .Exists(Timeout) function is specified in milliseconds.

6. The .WaitProperty(x, y, Timeout) function is specified in milliseconds.

7. The Wait seconds [, milliseconds] subroutine is specified in both seconds and an optional milliseconds arg, but why? The first arg, seconds, can be specified as 0.250 or whatnot to get a millisecond wait, so you only really need the first arg.

No doubt this list is incomplete. So I hope others will reply and fill in the gaps.

P.S. Even though the QTP Online [un?]Help indicates that the .Exist timeout is set in milliseconds, my very recent impirical debugging seems to indicate that this value is really set in seconds

Monday, August 15, 2011

QTP Framework

To start the testing with QTP, there is an important concept to understand i.e. framework. Frameworks basically define the way to handle the different operations in different methods.

As we all known we can create the test in two ways in QTP i.e. by recording and by scripting. We should also know that how we can improve the quality of test by using Framework concept. Basically QTP supports three kind of framework i.e. Linear, Modular, and Keyword Driven Framework.

In all three frameworks, Linear Framework is very easy and catchy by all newbie and beginner of QTP. Basically Linear Framework deals with individual script which is recorded under one Action and running individual. I think we all done this thing in very first when we get the QTP but I’m very sure, not all one know that we created and executed the test under Linear Framework. Anyway this is not big deal. I was also not aware when I get the QTP first time. So this is very simple and easy way to create the test by navigating through the application. But by using this method there are some limitations which we can not cross. Sometime when we test some business processes in one application, we may feel that some operations we repeat in all Linear Framework Script. To handle this situation we go with Modular Framework which solves this kind of problem by dividing the single test in multiple part or module.

In modular framework, tester basically divides the test in different parts which give the facility to use the different part of scripts in any tests. That solves the many problem of repeataion of test and gives the facility to make the script reusable? So in one sentence, Division of Linear Framework script in different parts called Modular Framework.

To understand the keyword driven framework, tester should know the basic of programming because it deals with function. In programming, Function is an important part of programming as they allow you to create chunks of code that performs a specific task. Basically we create the functions in the one test and calling these functions as keyword in other tests therefore we are calling keyword driven framework. This is very important and useful framework to deal and handle many critical tasks in testing through QTP.

Tuesday, August 9, 2011

QTP Add ins


QTP supports various applications, But it won't support all the applications by default. We need to load the corresponding add-in.

For example, if you are going to use QTP for a java application you need to load java add-in.

This add-in concept will help QTP to support wide-range of applications without compromising the performance. And, it will improve object identification reliability.

Find below the Add-in list supported by QTP. If you know any other add-in available for QTP, you can mention it in the comments section.


In previous versions of QTP, only few below mentioned add-ins will be available as default support.


Default Support
1. Standard Windows applications (invisible in the add-in manager)
2. Web objects / Applications
3. ActiveX controls
4. Visual Basic applications

In the previous versions, below add-ins should be loaded separately.

Additional QuickTest add-ins Support
1. Java
2. Oracle
3. SAP
4. .NET
5. Web Forms
6. Siebel
7. PeopleSoft
8. Web services
9 Main frame (Terminal Emulator)

You can select the required Add-ins while starting the QTP.

The below add-in manager screen will appear when opening QTP. In the screen you can select the required add-ins using the check-box.

If you don't want to see this add-in Manager again, you can uncheck the "Show on Startup" checkbox.


You won't see this add-in Manager if you have unchecked "Show on Startup" checkbox.


To make it appear again, you need to check the "Display Add-in Manager on Startup" checkbox in the Options Dialog (Tools->Options).


Object Identification window (Tools->Object Identification...) will allow to handle properties of Test Object classes available in each loaded add-ins.

Whenever we open an existing Test, we should load all the add-ins used in that particular Test. Otherwise the below message will be shown.

"The following add-ins were associated with your test but are not currently loaded."

Difference between qtp licenses

The seat license is specific to computer on which it is installed. Each installation of quick test pro requires a distinct permanent license key. When a QA Engineer selects seat license option during initial software installation, he/she also gets a 14 day evaluation period during which the company much request a QTP license code for a permanent license from HP/Mercury customer service.

The concurrent license is specific to organization on which it is installed. Each license entitles the company to one additional concurrent user running automated testing tool. There is no limit to the number of qtp 9.1 installations around company, but a special concurrent license server regulates the number of computers that can run a copy of quick test professional at any time.